

HOME EXERCISE PROGRAM
Pain-free living starts at home
Movement is medicine—science proves it. Studies show that home-based exercise programs can reduce chronic pain by 30–60% while activating your body’s natural pain-relieving systems. With the right approach, you can manage pain right from your living room.
What’s more, research shows that home exercises are just as effective as clinic treatments when done correctly. That means you don’t need fancy equipment or appointments—just consistency, good form, and a little guidance.
Safety Reminders
Consult with a healthcare provider before starting any new exercise program, especially if you have chronic health conditions or take medications.
Your safety is the foundation of effective pain relief—these guidelines ensure you exercise within healthy limits while avoiding injury. Use the pain scale below to monitor your comfort level and know when to modify or stop your routine.

Pain Scale Guide
0-2: No pain/minimal discomfort
SAFE TO EXERCISE
3-5: Mild to moderate pain
EXERCISE WITH CAUTION
6-8: Significant pain
MODIFY OR STOP
9-10: Severe pain
SEEK MEDICAL ATTENTION

When to Stop Immediately
-
Sharp, shooting pain, especially down arms or legs
-
Numbness or tingling in hands, feet, limbs
-
Feeling faint, dizzy, or sick
-
Chest pain or shortness of breath
-
Loss of bladder/bowel control

Progression Guidelines
-
Week 1-2: Master the movements, focus on form
-
Week 3-4: Increase repetitions gradually
-
Week 5+: Add duration and new exercises
-
Always: Listen to your body
Medical Disclaimer
The exercises and information provided are for educational purposes only and are not intended as medical advice. Before beginning any exercise program, consult with your physician or qualified healthcare provider, especially if you have existing health conditions or take medications.
By using these exercises, you acknowledge that:
-
You participate at your own risk
-
Individual results may vary and are not guaranteed
-
These exercises are not a substitute for professional medical treatment
-
You assume full responsibility for your health and safety
Warning: Stop immediately and seek medical attention if you experience chest pain, severe pain, dizziness, numbness, or any concerning symptoms.
Rehab Associates disclaims all responsibility for any injury, loss, or damage that may result from following these exercises. We strongly recommend consulting with a licensed physical therapist for personalized assessment and offer FREE Phone consultations.
Step-by-Step Home Exercises for Every Major Body Part
Ready to transform your living room into a pain relief center? These 12 evidence-based exercises target every major body part where pain commonly strikes.
Lower Back Pain Exercises

Cat-Cow Stretch
Lower back pain relief starts with gentle mobilization. The cat-cow stretch remains one of the most effective movements.
-
Start on hands and knees.
-
Inhale and let your belly sag like a cow.
-
Exhale and slowly arch your back upward like a cat.
-
Move slowly between positions 3-5 times, twice daily.
This simple movement increases spinal flexibility and reduces muscle tension.
Bridge Exercise
For strengthening, bridge exercises provide exceptional results.
-
Lie on your back with knees bent.
-
Tighten your core and glutes, then lift your hips to form a straight line from knees to shoulders.
-
Hold for three deep breaths, starting with 5 repetitions and building to 30.
Bridges strengthen your entire posterior chain while being gentle on sensitive backs.

Neck Pain Exercises
Chin Tuck

Chin tucks counteract forward head posture and strengthens deep neck muscles. Research shows that specific resistance band exercises performed 5 days per week can reduce work-related neck pain by up to 75%.
-
Sit or stand tall with your shoulders relaxed while looking straight ahead, ensuring your ears are aligned over your shoulders.
-
Gently tuck your chin straight down, as if creating a double chin. Avoid bending your head forward.
-
Hold the tucked-in position for a few seconds (e.g., 5 seconds).
-
Relax and return from the tuck position to the starting position.
-
Repeat the exercise 10-15 times.
Neck Side Stretch
This gentle neck stretch targets the lateral muscles that often become tight from poor posture, computer work, or stress, providing immediate relief from neck tension and stiffness. Perform this stretch 2-3 times daily, especially after long periods of sitting or when you feel neck tension building up throughout the day.
-
Sit or stand with your head facing forward, maintaining good posture.
-
Slowly tilt your head to the right, bringing your right ear towards your right shoulder.
-
Hold this position for 5-10 seconds, feeling the stretch along the left side of your neck.
-
Gently bring your head back to the starting position.
-
Repeat on the other side: Tilt your head to the left, bringing your left ear towards your left shoulder, and hold for 5-10 seconds.
-
Repeat the stretch 10 times on each side.

Shoulder Pain Exercises
Pendulum Swings

Pendulum stretches involve leaning over a table and letting your affected arm hang, then gently swinging it forward, backward, and side to side.
-
Find a sturdy surface (table, chair, or countertop) for support with your unaffected arm.
-
Lean forward at your waist, allowing your affected arm to hang down towards the floor and your shoulder muscles to relax completely.
-
Use your body's movement, such as rocking back and forth or side to side, gently swing your arm in a circular motion (clockwise and counterclockwise) or back and forth. Avoid actively using your shoulder muscles to swing your arm; let gravity and your body's movement do the work.
-
Gradually increase range of motion as your shoulder gets more comfortable, but always stop if you feel any pain.
Wall Push-Ups
-
Find a wall sturdy enough to support your weight when leaning against it and stand facing the wall about an arm's length away.
-
Place your palms flat on the wall at shoulder height and slightly wider than your shoulders. Keep your body in a straight line from your head to your heels, with your feet flat on the floor.
-
Slowly bend your elbows and lean your upper body towards the wall, maintaining a straight back until your nose almost touches the wall. Your elbows should point downwards and not flare out to the sides.
-
Straighten your arms in a controlled motion to return to the starting position.
✅ Tip: Start with 5-10 repetitions and build gradually to 15-20 as your strength improves.

Hip Pain Exercises
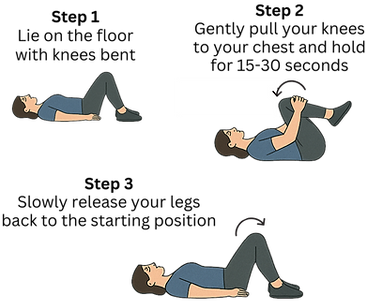
Knees to Chest Stretch
-
Lie on your back with your knees bent and feet flat on the floor.
-
Gently pull both knees towards your chest until you feel a comfortable stretch in your lower back and hips. Hold for 15-30 seconds.
-
Slowly release your legs back to the starting position.
-
Repeat the stretch on the same side or alternate between legs, performing 2-4 repetitions per side.
Hip Flexor Stretch
-
Begin by kneeling on the floor with one knee down and the other foot in front, forming a 90-degree angle at both knees. Make sure your hips are square and not tilted. Keep your torso upright and engage your core.
-
Push Your Hips Forward: Gently push your hips forward, keeping your back straight. You should feel a stretch in the front of the hip on the leg that's kneeling. Hold the stretch for 20-30 seconds, breathing deeply to relax into the stretch.
-
Switch legs and repeat the stretch on the opposite side.
✅ Tip: Ensure that your knee is not going beyond your toes and keep your pelvis tucked under slightly to avoid straining the lower back.

Knee Pain Exercises
Straight Leg Raises

-
Lie flat on your back on a comfortable surface, such as a mat, with one knee bent and the other leg straight. Keep your legs extended and your arms at your sides. The straight leg should be fully extended with your toes pointing upward.
-
Slowly raise your straight leg about 6-12 inches off the ground, keeping your knee straight and engaging your quadriceps. Hold the position for 1-2 seconds at the top, keeping your core engaged and avoiding any lower back arching.
-
Slowly lower your leg back to the ground with control, resisting gravity.
-
Repeat: Perform 10-15 repetitions on one leg before switching to the other leg.
✅ Tip: Focus on using your thigh muscles to lift the leg, not your hips or lower back. Keep your movements slow and controlled for maximum benefit.
Wall Sits
-
Stand with your back flat against a sturdy wall and feet about 2 feet away from the wall, hip-width apart.
-
Slide your back down the wall slowly while bending your knees. Lower yourself until your thighs are parallel to the floor and your knees are directly above your ankles—your legs should form a 90-degree angle.
-
Hold this position for 20–60 seconds, depending on your fitness level. Keep your core engaged, back flat against the wall, and arms relaxed at your sides .
-
Return to the standing position.
-
Repeat 2-5 times while resting 30-60 seconds between each set.
✅ Tips
-
Extend your arms forward while in the seated position for more challenge.
-
Do wall sits 3–4 times per week for best results.
-
Gradually increase your hold time as your strength improves.

Foot & Ankle Pain Exercises
Calf Stretch

-
Stand facing a wall, chair, or any stable object you can comfortably lean on.
-
Step back to place one foot a comfortable distance behind the other, ensuring the toes of both feet are pointing forward.
-
Bend your front knee and gently lean forward, pushing your hips towards the support, until you feel a stretch in the calf of your back leg. Keep the heel of your back foot flat on the ground.
-
Maintain the stretch for 20-30 seconds, breathing deeply and relaxing into the stretch.
-
Switch legs and repeat the stretch on the other side.
✅ Tips
-
Do 2–3 repetitions per leg.
-
Don’t let your back heel lift off the floor.
-
Keep your posture upright and avoid bouncing.
Toe Curls and Spreads
-
Sit with your feet flat on the floor, knees bent at a 90-degree angle, and your back straight.
-
Curl all your toes downward, as if trying to make a fist with your foot. Hold this position for a few seconds.
-
Spread your toes as wide as possible. Hold this position for a few seconds.
-
Repeat: Repeat the curling and spreading motion for a set number of repetitions (e.g., 10-15 times).
✅ Tip: You can also perform toe curls using a towel. Place a small towel under your feet and curl your toes to grasp the towel, pulling it towards you.

GET YOUR FREE
Complete Home Exercise Guide
Get expert advice, step-by-step instructions for pain relief for every major body part, and exercise trackers to help keep you on track.

Need some help?
Discover how a Rehab Associates physical therapist help you with tailored exercises exercise program thats activates your body’s natural pain-relieving system.
Next-day appointments available. No physician referral needed.